Web Components are a W3C standard that is getting really popular nowadays. In a nutshell, Web Components allow us to encapsulate and share reusable components or widgets. In web development, the combination of libraries and frameworks used in a project is big, as is the amount of testing required to make sure everything works well together. As the application grows over time, it becomes harder to maintain the code and make enhancements. As you can imagine, this makes the development process not as smooth as it could be.
For each project, we create components: a tabbed navigation, a menu, modal windows. None of these are 100% fully reusable. Why, you may ask? Because they have custom CSS styles that may or may not end up messing up the styles in other projects, or the javascript for them to work may use an angular plugin that doesn't work on a backbone project, or they use a jQuery version that conflicts with some other Javascript dependency. So, we always end up rebuilding the wheel. Or a good part of it. And that is really frustrating.
Well, these times are over! For 4 years, since 2011 when they were introduced, Web Components have been carving their path to become the legos we use to build an interface.
What's the point of using these components?
To begin with, you can create your own custom elements which can do just about everything you need. Instead of loading up your sites with too much markup, lots of dependencies and long scripts, you wrap everything up into nice, custom HTML elements.
At this point, you're saying "we've already had this since HTML5 came up, this isn't new!". Well spotted, friend. Today, we use the <video> and <audio> tags all the time, and they are pretty much Web Components. They are usually just hidden from the developer.
So, like the <video> tag, a Web Component is represented by a custom HTML element. This component works like an umbrella, a group of small parts, that enable developers to build reusable components.
These parts are:
- HTML templates <template>
- Shadow DOM
- HTML Imports
- Custom Elements
HTML Templates
HTML Templates are a way of having a portion of DOM that can be reused on the page. They are a method of declaring reusable markup that is parsed but not rendered until its activation.
The <template> content is suspended until activated because its child nodes don't exist in the DOM. It has no side effects (scripts don't run, images don't load, CSS isn't applied) until the template is used.
You can place it anywhere: head, footer, body and since it doesn't load anything of its content, this can be used as a performance hack.
<template id="foo">
  <style>
    /* styles scoped to template only */
  </style>
  <div class="someclass">
    template text here
    <div class="someotherclass">
      <content></content>
    </div>
  </div>
</template>
5 benefits of <template> :
- Can have scoped CSS
- Invisible
- Inactive
- Reusable
- Importable
Shadow DOM, all about being a ninja!
Shadow DOM refers to the browser's ability to render a subtree of DOM nodes into the document, without including it in the main document DOM tree, while also providing encapsulation for the CSS, JS, and HTML.
So, for example, when you use the <audio> tag:
<audio controls>
  <source src="horse.ogg" type="audio/ogg" />
  <source src="horse.mp3" type="audio/mpeg" />
  Your browser does not support the audio element.
</audio>
It will generate the play bar and its controls:

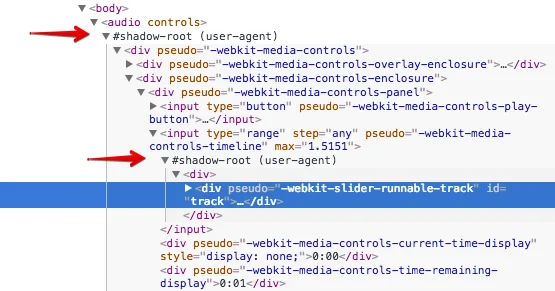
But in reality, it has a lot more HTML structure beneath its custom element:

So, as you can tell, Shadow DOM is hidden and not available to the rest of the page, although it can be made visible in Chrome Dev Tools settings:

Only then will it show up as a node in the elements panel:

Entry point to Shadow DOM:
Another part of the Shadow DOM spec is the <content> tag. It acts as the insertion point that projects the text from the shadow host to shadow root.
<!-- Our cool template -->
<template id="my_template">
  <style>
    ...;
  </style>
  <article id="container">
    <content select=".title"></content>
  </article>
</template>

<!-- Our parent doc -->
<div id="host-document">
  <h1 class="title">My title</h1>
  <div>...</div>
</div>
In this example, we are appending the content of the #host-document to the shadow host, through the <content> tag. This is done using the createShadowRoot method.
var host = document.querySelector('#host-document');
var root = host.createShadowRoot();

var template = document.querySelector('#my_template');
var clone = document.importNode(template.content, true);

root.appendChild(clone);
An element that has a shadow root associated with it is called a "shadow host". The shadow root can be treated as an ordinary DOM element, so you can append arbitrary nodes to it. Source
Since the Shadow DOM encapsulates HTML, its styles wont affect the rest of the page, CSS selectors inside the shadow DOM won't target other elements in the page, and as for javascript, the code running on the page will not be aware of the Shadow DOM either.
So how can we target the Shadow DOM elements and their classes?
* {
  color: black;
}
::shadow p {
  color: #bada55;
}
my-element {
  display: block;
}
my-element:unresolved {
  opacity: 0;
}
my-element::shadow {
  /*target the shadow root */
}
::shadow p {
  /* any p within any shadow root */
}
For javascript, you can access it via the read-only shadowRoot property.
HTML Imports
An HTML Import can bundle your JS, HTML and CSS in a single URL. You include it in your page like a normal dependency making it reusable across the whole project.
<link rel="import" href="templateName.html" />
The import itself has to be from the same origin, or CORS errors will show up.
The HTML Import can access its own DOM and the DOM of the importing document. The <link> tag must have rel="import" declared.
Importing a template doesn't mean you are placing its contents in the document. You're just fetching the file for later use. To actually use its contents, you have to write some JavaScript:
var link = document.querySelector('link[rel="import"]'),
  content = link.import;

var el = content.querySelector('.anyClass'); // Grabbing DOM from templateName.html

document.body.appendChild(el.cloneNode(true)); // Appending it to the document
Custom elements
For a custom element, the big value is semantics. Being able to write <gallery-module> is simpler and more intuitive than filling up the HTML with a bunch of <div> tags that say nothing to those who read them.
How to create one:
- Name the element: all lower-case and must contain a hyphen/dash. Ex: <fb-feed>
- Define a prototype
- Register the Element with document.registerElement()
var FBFeed = document.registerElement('fb-feed');
document.body.appendChild(new FBFeed());
The custom element that you import creates a shadow DOM from a <template>, then registers itself. Imports can execute scripts, so you can use imports to define and register custom elements.
So let's get clear, the goal of Web Components is to reduce complexity by isolating some HTML, CSS and JavaScript code, to perform some function within the context of a page. They let you extend HTML with new capabilities, so you can write better web apps faster. They also bring value by allowing you to distribute this code cross-browser and cross-framework.
The Bad part is... "So, can we start using them?"
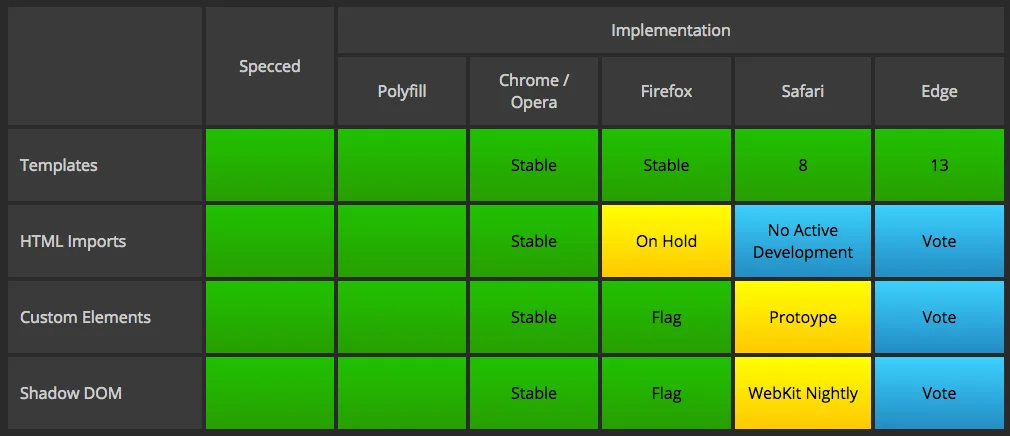
Well... partially. take a look.
The main issue with Web Components is its support. No browser supports them completely. Luckily, there are libraries like Polymer from Google and X-Tag from Mozilla, that act as a polyfill for the missing native browser features. But wait, there's more! No matter if they are built with Polymer or X-Tag, they can work together, and that is exactly the holy grail of standardization.
Polymer is a framework that is based on Web Components technologies. You can make and use Web Components without Polymer.

Conclusion
In conclusion, we can tell this is a great approach to standardization, a much cleaner way to create reusable UI elements, with encapsulation and their own logic. They have been in development for over three years, and all major browsers are actively working on their support, so it's close! Hang in there. Thanks for taking the time to read this fundamental post and hope you enjoyed it!


